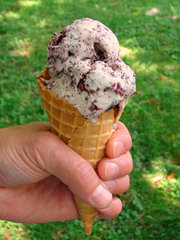
Wright House Ice Cream. This is my own interpretation on the traditional “White House” ice cream flavor. It is the quintessential summertime ice cream!!
This is the quintessential summertime ice cream and my very favorite. It is my interpretation of the traditional White House ice cream — a little-known, old-fashioned flavor that deserves attention. A judicious cream & egg base makes for an incomparable richness that isn’t excessive while the French vanilla influence combines with cherries, chocolate and walnuts to make a symphonic medley in your mouth that can only come from one’s own kitchen, not a package or store. Savor it. The flavor will linger in your dreams long after the summer sun fades.
Ingredients:
(to make 6 quarts)
- 4 Cups heavy cream
- 4 Cups 2% milk
- 6 Large whole eggs (farm-fresh preferred)
- 2 ½ Cups granulated sugar
- 1 teaspoon salt
- 1 Vanilla Bean (bourbon bean preferred)
- 2 Teaspoons Vanilla Extract
- ½ Pound chopped walnuts
- ½ Pound chopped semisweet chocolate chips
- 2 Pounds whole, dark, sweet, frozen cherries
Directions
- Whisk eggs with sugar and salt into a large mixing bowl then set aside.
- Split the vanilla bean along its length and scrape the seeds into a large 6-quart pan. Add the bean casing, milk, and cream into the saucepan and bring to a simmer while stirring constantly.
- Gradually whisk the hot cream mixture into the bowl with the egg mixture.
- Pour the combined cream and egg mixture back into the large pan and cook over medium heat, stirring constantly until it reaches a temp of 170° degrees or coats the back of a metal spoon. Do NOT allow the mixture to boil.
- Refrigerate while stirring the mixture every hour until cold (about 4 hours).
- After the mixture is chilled, remove the vanilla bean casing and stir in the vanilla extract. Freeze in a
6-quart ice cream maker according to manufacturer’s directions. - While the mixture freezes, finely chop the chocolate chips, then separately chop the walnuts and frozen cherries to medium size in a food processor. Combine into a large bowl.
- While the creamer is working its magic, enjoy an adult beverage and some good tunes.
- Once the cream mixture is frozen, scrape the mixture from the dasher (paddle) and let the kids lick it clean outside on the deck. After all, it’s summertime!
- Ladle the frozen cream mixture into five 5-cup storage containers. Fill each half way, spoon in 1 cup of the walnut/cherry/chocolate mixture, then fill the container to ½” from the top with more of the frozen cream mixture. With a wooden spoon, fold the ingredients together in each container and level the mixture.
- Divide the remaining walnut/cherry/chocolate mixture by spreading onto the top of the cream in each container. Cover and freeze in the bottom of your freezer at least overnight.
Try to resist the temptation to eat it out of the creamer. It is much better frozen solid and after flavors mellow. Serve hard-packed scoops into a waffle cone. Eat it neked without any corrupting influence of syrups. Calories or saturated fat content? If you have to ask, you shouldn’t be eating it. Come on… how long has it been since you had homemade ice cream, particularly like this?! Enjoy!
For the Novice: the Do’s and Don’ts
Do make it ahead of time and allow your frozen cream to harden in your freezer for 24 hours. You will be amazed at the mellowing of flavors and how the texture improves when frozen hard.
Do make sure your freezer is cooling to 0° Fahrenheit.
Do taste your mixtures throughout the process but keep it clean!
Do splurge a bit and get the vanilla bean. Although the cost may strike you as high (I paid about $6 for a single bean at my local grocery), the complexity of flavor it adds is well worth the expense. If you must leave the bean out, then add additional vanilla extract. I’d start with an extra 11/2 teaspoons then taste the mixture.
Do make sure you have extra ice hand. It wouldn’t be unusual to go through 10 pounds of ice when freezing 6 quarts. It’s a good idea to have your ice in a cooler right by your creamer (which is setting in your sink) with a plastic bowl to dish it out
Do add plenty of salt to your creamer. Any type of granulated household salt will do, even table salt, as long as you add the appropriate amount. Salt lowers the freezing point and produces a super-cold water jacket around your cream to freeze it. Freeze it quickly by using the right amount of salt in the creamer and you will create an small ice crystals, making an amazing smooth texture.
Don’t allow the cooking mixture to boil! You want ice cream, not scrambled eggs!
Don’t allow salt to contaminate your freezing cream. Sure, there’s salt in the recipe but spilling salt water or granules of rock salt into your cream will make for some unpleasant surprises while eating.
Don’t freeze your cream on the backyard lawn with a salt-n-ice creamer. Creamers of this style allow the escaping salt water that is produced in the creamer to drain out a hole in the creamer. It’ll kill vegetation. It’s usually convenient to place the creamer in the empty kitchen sink. If you are outside, make sure you use a dishpan to catch any effluent.
Don’t put the nuts, cherries, and chocolate into the creamer while it is freezing. The dasher (the paddle inside the creamer) will blend the contents down into a homogenized mass of sameness — perhaps tasty but not astounding. You want pockets of varying flavor and texture so fold it in right before placing in your containers.


